async / await in TypeScript

"use strict";
// printDelayed is a 'Promise<void>'
async function printDelayed(elements: string[]) {
  for (const element of elements) {
    await delay(400);
    console.log(element);
  }
}
async function delay(milliseconds: number) {
  return new Promise<void>((resolve) => {
    setTimeout(resolve, milliseconds);
  });
}
printDelayed(["Hello", "beautiful", "asynchronous", "world"]).then(() => {
  console.log();
  console.log("Printed every element!");
});

References
https://www.typescriptlang.org/docs/handbook/release-notes/typescript-1-7.html

React.memo, useMemo and useCallback

React.memo

If your component renders the same result given the same props, you can wrap it in a call to React.memo for a performance boost in some cases by memoizing the result. This means that React will skip rendering the component, and reuse the last rendered result.

React.memo only checks for prop changes. If your function component wrapped in React.memo has a useState, useReducer or useContext Hook in its implementation, it will still rerender when state or context change.


Counter.tsx

function Counter() {

    const [counter, setCounter] = useState(0);

    console.log("Counter : " + Date.now());

    return (
        <div className="mx-4 my-2">
            <div>
                Count : {counter}
            </div>
            <div>
                <button type="button" className="btn"
                        onClick={event => setCounter(prevState => prevState + 1)}>Increase
                </button>
                <button type="button" className="btn"
                        onClick={event => setCounter(prevState => prevState - 1)}>Decrease
                </button>
            </div>
            <Logger/>
        </div>
    );
}

export default Counter;

Logger.tsx ( Before using React.memo )

function Logger() {
    return (
        <div>
            Logger Component
            {console.log("Logger : " + Date.now())}
        </div>
    );
}

export default Logger;

Logger.tsx ( After using React.memo )

function Logger() {
    return (
        <div>
            Logger Component
            {console.log("Logger : " + Date.now())}
        </div>
    );
}

export default React.memo(Logger);


Custom Comparison Function

By default it will only shallowly compare complex objects in the props object. If you want control over the comparison, you can also provide a custom comparison function as the second argument.

function MyComponent(props) {
  /* render using props */
}
function areEqual(prevProps, nextProps) {
  /*
  return true if passing nextProps to render would return
  the same result as passing prevProps to render,
  otherwise return false
  */
}
export default React.memo(MyComponent, areEqual);

useMemo

Pass a “create” function and an array of dependencies. useMemo will only recompute the memoized value when one of the dependencies has changed. This optimization helps to avoid expensive calculations on every render.

Remember that the function passed to useMemo runs during rendering. Don’t do anything there that you wouldn’t normally do while rendering. For example, side effects belong in useEffect, not useMemo.

If no array is provided, a new value will be computed on every render.

const memoizedValue = useMemo(() => computeExpensiveValue(a, b), [a, b]);

useCallback

Pass an inline callback and an array of dependencies. useCallback will return a memoized version of the callback that only changes if one of the dependencies has changed. This is useful when passing callbacks to optimized child components that rely on reference equality to prevent unnecessary renders (e.g. shouldComponentUpdate).

useCallback(fn, deps) is equivalent to useMemo(() => fn, deps).

const memoizedCallback = useCallback(
  () => {
    doSomething(a, b);
  },
  [a, b],
);

Should you use React.memo() or useMemo()?
Choosing between React.memo() and useMemo() should be straightforward. Now you have a good understanding of both of them.

  • Use React.memo to memoize an entire component.
  • Use useMemo to memoize a value within a functional component.

References
https://reactjs.org/docs/react-api.html#reactmemo
https://reactjs.org/docs/hooks-reference.html#usememo
https://reactjs.org/docs/hooks-reference.html#usecallback
https://blog.bitsrc.io/react-memo-vs-usememo-5730b90f0682
Using React Context

AuthContext

import React, {useState} from "react";

export interface AuthContextType {
    isLoggedIn: boolean,
    logIn: () => void,
    logOut: () => void,
}

const AuthContextDefault: AuthContextType = {
    isLoggedIn: false,
    logIn(): void {
    },
    logOut(): void {
    }
};

const AuthContext = React.createContext(AuthContextDefault);

export const AuthContextProvider = (props: any) => {

    // we need to initialize state from local storage because we should keep users logged in on page refresh
    const [isLoggedIn, setIsLoggedIn] = useState(() => {
        if (localStorage.getItem("isLoggedIn") === "1") {
            return true;
        }

        return false;
    });

    const logInHandler = () => {
        setIsLoggedIn(true);
        // save in local storage
        localStorage.setItem("isLoggedIn", "1");
    };

    const logOutHandler = () => {
        setIsLoggedIn(false);
        // remove from local storage
        localStorage.removeItem("isLoggedIn");
    }

    return <AuthContext.Provider value={{isLoggedIn: isLoggedIn, logIn: logInHandler, logOut: logOutHandler}}>
        {props.children}
    </AuthContext.Provider>
        ;
};

export default AuthContext;

index

import React from 'react';
import ReactDOM from 'react-dom';
import './index.css';
import App from './App';
import reportWebVitals from './reportWebVitals';
import {BrowserRouter} from "react-router-dom";
import {AuthContextProvider} from "./context/AuthContext";

ReactDOM.render(
    <BrowserRouter>
        <React.StrictMode>
            <AuthContextProvider>
                <App/>
            </AuthContextProvider>
        </React.StrictMode>
    </BrowserRouter>
    ,
    document.getElementById('root')
);

reportWebVitals();

Login

import AuthContext from "../context/AuthContext";
import {useContext} from "react";

function Login() {

    const authCtx = useContext(AuthContext);

    return (
        <div className="m-2">
            <div>
                <span>Username : </span>
                <input type="text" className="input input-bordered w-full max-w-xs ml-2"
                       placeholder="Enter Username"/>
            </div>

            <div>
                <span>Password : </span>
                <input type="password" className="input input-bordered w-full max-w-xs ml-2"
                       placeholder="Enter Password"/>
            </div>
            <div className="mt-4">
                <button type="button" className="btn" onClick={authCtx.logIn}>Login</button>
                <button type="button" className="btn ml-2" onClick={authCtx.logOut}>Logout</button>
            </div>
        </div>
    );
}

export default Login;

User

import AuthContext from "../context/AuthContext";
import {useContext} from "react";

function User() {

    const authCtx = useContext(AuthContext);

    return (
        <div>
            {authCtx.isLoggedIn && "Logged in"}
            {!authCtx.isLoggedIn && "Logged out"}
        </div>
    )
}

export default User;

References
https://reactjs.org/docs/context.html

Using the useReducer Hook in React

import {useReducer} from "react";

interface CounterAction {
    type: CounterType,
    data: number
}

enum CounterType {
    INCREASE,
    DECREASE
}

interface CounterState {
    count: number
}

function CounterReducer(state: CounterState, action: CounterAction): CounterState {

    if (action.type === CounterType.INCREASE) {
        return {...state, count: state.count + action.data}
    } else if (action.type === CounterType.DECREASE) {
        return {...state, count: state.count - action.data}
    }

    return {...state};
}

function Counter() {

    // initial value for counter
    const counterInitializerArg: CounterState = {count: 0};
    // counter value
    let counterState: CounterState;
    // this is a function with CounterAction as parameter, it will increase/decrease counter value by 1
    let counterDispatch: (payload: CounterAction) => void;

    [counterState, counterDispatch] = useReducer(CounterReducer, counterInitializerArg);

    return (
        <>
            <div>
                Count : {counterState.count}
            </div>
            <div>
                <button type="button" className="btn"
                        onClick={event => counterDispatch({type: CounterType.INCREASE, data: 1})}>Increase
                </button>
                <button type="button" className="btn"
                        onClick={event => counterDispatch({type: CounterType.DECREASE, data: 1})}>Decrease
                </button>
            </div>
        </>
    );
}

export default Counter;

Specifying the initial state

There are two different ways to initialize useReducer state. You may choose either one depending on the use case. The simplest way is to pass the initial state as a second argument:

const [state, dispatch] = useReducer(
  reducer,
  {count: initialCount}
);

Lazy initialization

You can also create the initial state lazily. To do this, you can pass an init function as the third argument. The initial state will be set to init(initialArg).

It lets you extract the logic for calculating the initial state outside the reducer. This is also handy for resetting the state later in response to an action:

function init(initialCount) {
  return {count: initialCount};
}

function reducer(state, action) {
  switch (action.type) {
    case 'increment':
      return {count: state.count + 1};
    case 'decrement':
      return {count: state.count - 1};
    case 'reset':
      return init(action.payload);
    default:
      throw new Error();
  }
}

function Counter({initialCount}) {
  const [state, dispatch] = useReducer(reducer, initialCount, init);
  return (
    <>
      Count: {state.count}
      <button
        onClick={() => dispatch({type: 'reset', payload: initialCount})}>
        Reset
      </button>
      <button onClick={() => dispatch({type: 'decrement'})}>-</button>
      <button onClick={() => dispatch({type: 'increment'})}>+</button>
    </>
  );
}

References
https://reactjs.org/docs/hooks-reference.html#usereducer
https://dev.to/craigaholliday/using-the-usereducer-hook-in-react-with-typescript-27m1

Working with Query Parameters in React Router

import {useLocation, useNavigate} from 'react-router-dom'

function Welcome() {
    const location = useLocation();
    const navigate = useNavigate();
    
    // URLSearchParams defines utility methods to work with the query string of a URL.
    const queryParams = new URLSearchParams(location.search);
    const paramName = queryParams.get("name");

    console.log(location);

    return (
        <div>
            <div>
                <button className={"btn mx-2"} onClick={event => {
                    navigate("/welcome");
                }}>Reset
                </button>

                <button className={"btn mx-2"} onClick={event => {
                    navigate("/welcome?name=Mahmood");
                }}>Mahmood
                </button>

                <button className={"btn mx-2"} onClick={event => {
                    navigate("/welcome?name=Nasim");
                }}>Nasim
                </button>
            </div>

            <div>Hello {paramName}</div>
        </div>
    );
}

export default Welcome;

References
https://reactrouter.com/docs/en/v6/getting-started/concepts#locations

Typechecking With PropTypes in React Typescript

InferPropTypes from @types/prop-types can be used to create type definitions from PropTypes definitions.

npm install --save prop-types
npm install --save @types/prop-types
import PropTypes, {InferProps} from 'prop-types';

function Button(props: InferProps<typeof Button.propTypes>) {
    return (
        <button type="button">
            {props.children}
        </button>
    );
}

Button.propTypes = {
    children: PropTypes.node,
    size: PropTypes.number,
}


Button.defaultProps = {
    size: 1,
}

export default Button;

PropTypes

Here is an example documenting the different validators provided:

import PropTypes from 'prop-types';

MyComponent.propTypes = {
  // You can declare that a prop is a specific JS type. By default, these
  // are all optional.
  optionalArray: PropTypes.array,
  optionalBool: PropTypes.bool,
  optionalFunc: PropTypes.func,
  optionalNumber: PropTypes.number,
  optionalObject: PropTypes.object,
  optionalString: PropTypes.string,
  optionalSymbol: PropTypes.symbol,

  // Anything that can be rendered: numbers, strings, elements or an array
  // (or fragment) containing these types.
  optionalNode: PropTypes.node,

  // A React element.
  optionalElement: PropTypes.element,

  // A React element type (ie. MyComponent).
  optionalElementType: PropTypes.elementType,

  // You can also declare that a prop is an instance of a class. This uses
  // JS's instanceof operator.
  optionalMessage: PropTypes.instanceOf(Message),

  // You can ensure that your prop is limited to specific values by treating
  // it as an enum.
  optionalEnum: PropTypes.oneOf(['News', 'Photos']),

  // An object that could be one of many types
  optionalUnion: PropTypes.oneOfType([
    PropTypes.string,
    PropTypes.number,
    PropTypes.instanceOf(Message)
  ]),

  // An array of a certain type
  optionalArrayOf: PropTypes.arrayOf(PropTypes.number),

  // An object with property values of a certain type
  optionalObjectOf: PropTypes.objectOf(PropTypes.number),

  // An object taking on a particular shape
  optionalObjectWithShape: PropTypes.shape({
    color: PropTypes.string,
    fontSize: PropTypes.number
  }),

  // An object with warnings on extra properties
  optionalObjectWithStrictShape: PropTypes.exact({
    name: PropTypes.string,
    quantity: PropTypes.number
  }),   

  // You can chain any of the above with `isRequired` to make sure a warning
  // is shown if the prop isn't provided.
  requiredFunc: PropTypes.func.isRequired,

  // A required value of any data type
  requiredAny: PropTypes.any.isRequired,

  // You can also specify a custom validator. It should return an Error
  // object if the validation fails. Don't `console.warn` or throw, as this
  // won't work inside `oneOfType`.
  customProp: function(props, propName, componentName) {
    if (!/matchme/.test(props[propName])) {
      return new Error(
        'Invalid prop `' + propName + '` supplied to' +
        ' `' + componentName + '`. Validation failed.'
      );
    }
  },

  // You can also supply a custom validator to `arrayOf` and `objectOf`.
  // It should return an Error object if the validation fails. The validator
  // will be called for each key in the array or object. The first two
  // arguments of the validator are the array or object itself, and the
  // current item's key.
  customArrayProp: PropTypes.arrayOf(function(propValue, key, componentName, location, propFullName) {
    if (!/matchme/.test(propValue[key])) {
      return new Error(
        'Invalid prop `' + propFullName + '` supplied to' +
        ' `' + componentName + '`. Validation failed.'
      );
    }
  })
};

References
https://reactjs.org/docs/typechecking-with-proptypes.html
https://blog.logrocket.com/comparing-typescript-and-proptypes-in-react-applications/

Nested Routes in React Router

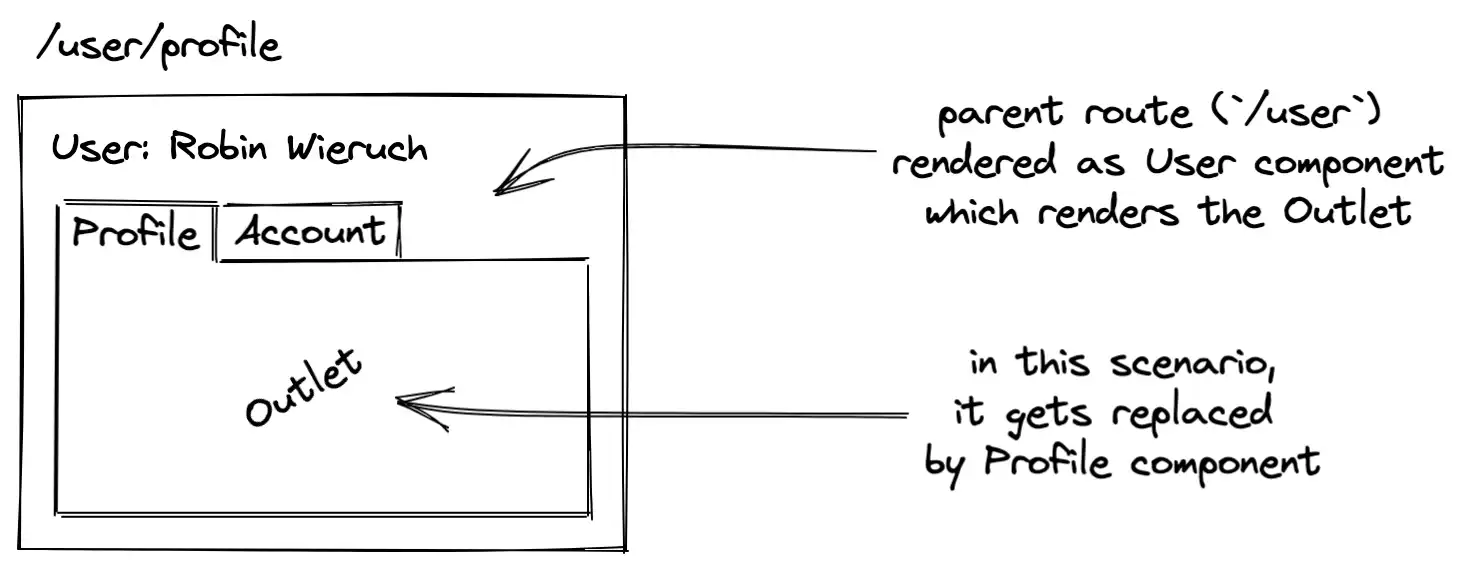
Imagine we want to have the nested routing for User page via tabs.

function App() {
    return (
        <div>
            <Routes>
                <Route path="/" element={<Home/>}/>
                <Route path="/user" element={<User/>}>
                    <Route path="account" element={<Account/>}/>
                    <Route path="profile" element={<Profile/>}/>
                </Route>
            </Routes>
        </div>
    );
}
function User() {
    return (
        <div>
            <h1>User Page</h1>
            <Link to="profile">Profile</Link>
            <br/>
            <Link to="account">Account</Link>
            <Outlet/>
        </div>
    );
}

The Outlet component will always render the next match.
The parent route (User) persists while the swaps between the two child routes (Profile and Account).

References
https://reactrouter.com/docs/en/v6/getting-started/tutorial#nested-routes
https://reactrouter.com/docs/en/v6/getting-started/concepts#outlets
https://ui.dev/react-router-nested-routes
https://www.robinwieruch.de/react-router-nested-routes/

Reading URL Params in React Router

App.tsx

function App() {
    return (
        <div>
            <Navbar/>
            <Routes>
                <Route path="/welcome" element={<Welcome/>}/>
                <Route path="/products" element={<Products/>}/>
                <Route path="/products/:product" element={<Product/>}/>
            </Routes>
        </div>
    );
}

Products.tsx

import {useParams} from 'react-router-dom'

function Product() {

    let params = useParams();

    return (
        <div>
            <strong>Product : </strong>{params.product}
        </div>
    );
}

export default Product;

References
https://reactrouter.com/docs/en/v6/getting-started/tutorial#reading-url-params