Use GPUpdate /Force Command to update your Group Policies

The command gpupdate /force is used to force the update of group policies that are applied by your company. Changes made in the Group Policy are not applied immediately but after 90 mins by default (with a ~30 min offset to spread the load). By using the GPUpdate command we can force the update.

Group Policies are used to change security settings and for system management (like deploying printers or mapping network drives). For troubleshooting IT problems, it’s sometimes necessary to update the group policy manually.

How force group policy update

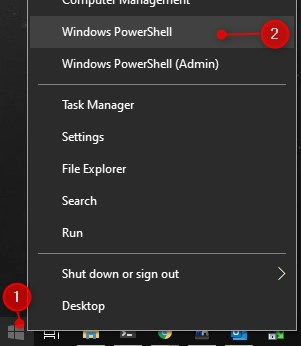
  1. Press Windows key + X or right-click on the start menu

  2. Select Windows PowerShell or Command Prompt

3. Type gpupdate /force and press enter

Wait for the Computer and User policy to update

4. Reboot your computer

A reboot is necessary to be sure that all settings are applied.

GPUpdate vs GPUpdate Force command

The gpupdate /force command is probably the most used group policy update command. When you use the /force switch, all the policy settings are reapplied. For most use cases this is perfectly fine, but keep in mind, when you have a lot of group policies objects (GPO) or in a large environment, using the /force will put a huge load on the domain controllers.

If you have a large tenant or a lot of GPO’s, then it’s better to only run gpupdate without the /force switch to apply new policy settings. This will get only the changes or new group policies, reducing the load on the client and domain controllers.

# Reapply all policies
gpupdate /force
# Get only the changed / new group policies
gpupdate

Update only user or computer group policies

If you have a large environment or need to update the group policies on a lot of computers at the same time, then it can be useful to only update what is needed. This will reduce the load on the domain controllers and it’s of course faster.

To do this you can use the /target switch. This allows you to update only the user or computer GPO’s.

# Update only the user policies
gpupdate /target:user
# Update only the computer policies
gpupdate /target:computer

Automatically reboot or logoff after GPUpdate

Not all policy changes are applied immidiately. Due to Fast Boot, for example, are some settings only applied when the users logs in on the computer. Some settings even require a reboot to be applied.

With the use of the /logoff or /boot switch, we can let gpupdate figure out if a logoff or reboot is necessary. To be clear, if you run gpupdate /boot, then the computer will only reboot if a policy change requires it. Otherwise, the policy will be applied immediately without the reboot.

  • GPUpdate /logoff is needed for example after policy changes in the Active Directory like folder redirections or printers. Changes in the AD are only applied when the user logs in on the computer.
  • GPUpdate /boot is for example needed when you create Software Distribution changes.

Run GPUpdate on a Remote Computer

Sometimes you may need to update quickly the group policies on multiple computers because you changed the internet proxy settings or maybe to replace a printer for example. There are couple of ways to run GPUpdate on a remote computer

Using the Group Policy Management Console

You can initiate a group policy update on a whole OU with the Group Policy Management Console. It has to be an OU with only computer objects in it, so you can’t use the method on a user OU. Simply right-click on the OU where you have changed a policy and click on Group Policy Update

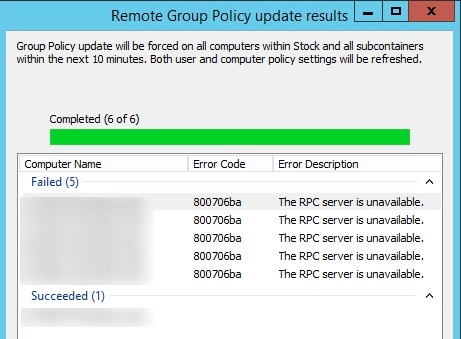
This will update the user and computer policies on all the computers in the given organization unit. The nice thing is that it will as for confirmation and show you how many computers are going to be updated.

After you have confirmed the update the policies will be updated and you can see the status of each computer. In this example 5 computers where turned off, so the update failed.

References
https://lazyadmin.nl/it/gpupdate-force-command/

NTFS Permissions vs Share

One of the most critical security concepts is permissions management: ensuring that proper permissions are set with users – and that usually means knowing the difference between share and NTFS permissions.

Share and NTFS permissions function completely separately from each other, but ultimately serve the same purpose: to prevent unauthorized access.

However, when NTFS and share permissions interact or when a shared folder is in a separate shared folder with different share permissions, users might not be able to access their data or they can get higher levels of access than security admins intend.

Here are key differences between share and NTFS permissions so you’ll know what to do.

What is NTFS?

A file system is a way of organizing a drive, indicating how data is stored on the drive and what types of information can be attached to files, such as permissions and file names.

NTFS (NT File System) stands for New Technology File System (NTFS). NTFS is the latest file system that the Windows NT operating system uses for storing and retrieving files. Prior to NTFS, the file allocation table (FAT) file system was the primary file system in Microsoft’s older operating systems, and was designed for small disks and simple folder structures.

NTFS file system supports larger file sizes and hard drives and is more secure than FAT. Microsoft first introduced NTFS in 1993 with the release of Windows NT 3.1. It is the file system used in Microsoft’s Windows 10, Windows 8, Windows 7, Windows Vista, Windows XP, Windows 2000, and Windows NT operating systems.

NTFS Permissions

NTFS permissions are used to manage access to the files and folders that are stored in NTFS file systems.

To see what kind of permissions you will be extending when you share a file or folder:

  • Right click on the file/folder
  • Go to “Properties”
  • Click on the “Security” tab

All then you’ll navigate this window:

Besides Full Control, Change, and Read that can be set for groups or individually, NTFS offer a few more permission options:

  1. Full control: Allows users to read, write, change, and delete files and subfolders. In addition, users can change permissions settings for all files and subdirectories.
  2. Modify: Allows users to read and write of files and subfolders; also allows deletion of the folder.
  3. Read & execute: Allows users to view and run executable files, including scripts.
  4. List folder contents: Permits viewing and listing of files and subfolders as well as executing of files; inherited by folders only.
  5. Read: Allows users to view the folder and subfolder contents.
  6. Write: Allows users to add files and subfolders, allows you to write to a file.

If you’ve ever involved in permissions management within your organization, you’ll eventually encounter ‘broken’ permissions. Rest assured, they’re repairable.

Share Permissions

When you share a folder and want to set the permissions for that folder – that’s a share. Essentially, share permissions determine the type of access others have to the shared folder across the network.

To see what kind of permissions you will be extending when you share a folder:

  • Right click on the folder
  • Go to “Properties”
  • Click on the “Sharing” tab
  • Click on “Advanced Sharing…”
  • Click on “Permissions”

And you’ll navigate to this window:

There are three types of share permissions: Full Control, Change, and Read.

  1. Full Control: Enables users to “read,” “change,” as well as edit permissions and take ownership of files.
  2. Change: Change means that user can read/execute/write/delete folders/files within share.
  3. Read: Read allows users to view the folder’s contents.

A Caveat on Share Permissions

Sometimes, when you have multiple shares on a server which are nested beneath each other, permissions can get complicated and messy.

For instance, if you have a “Read” folder in a subfolder share permission but then someone creates a “Modify” share permission above it at a higher root, you may have people getting higher levels of access then you intend.

There’s a way around this, which I’ll get to below.

How to Use Share and NTFS Permissions Together

One of the common questions that comes up when you’re configuring security is “what happens when share and NTFS permissions interact with each other?”

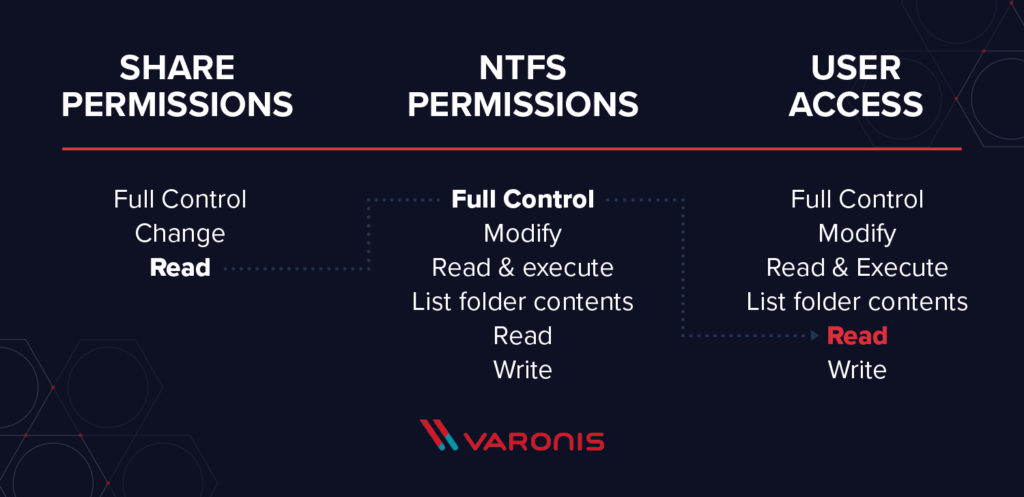
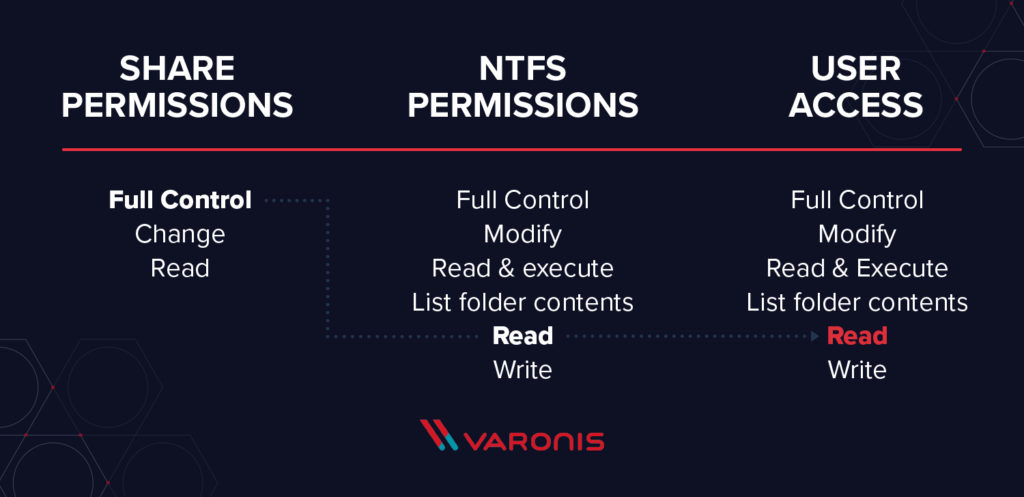
When you are using share and NTFS permissions together, the most restrictive permission wins.

Consider the following examples:

If the share permissions are “Read”, NTFS permissions are “Full control”, when a user accesses the file on the share, they will be given “Read” permission.

If the share permissions are “Full Control”, NTFS permissions are “Read”, when a user accesses the file on the share, they will still be given a “Read” permission.

Managing NTFS Permissions and Share Permissions

If you find working with two separate sets of permissions to be too complicated or time consuming to manage, you can switch to using only NTFS permissions.

When you look at the examples above, with just three types of permissions setting, shared folder permissions provide limited security for your folders. Therefore, you gain the greatest flexibility by using NTFS permissions to control access to shared folders.

Moreover, NTFS permissions apply whether the resource is accessed locally or over the network.
To do this, change the share permissions for the folder to “Full Control.”

You can then make whatever changes you want to the NTFS permissions without having to worry about the share permissions interfering with your changes.

References
https://www.varonis.com/blog/ntfs-permissions-vs-share/

Authenticated Users vs Domain Users

Both are built-in groups introduced in windows to control security of objects like user,computer and service account at different level. 

Authenticated Users

The Authenticated Users group contains users who have authenticated to the domain or a domain that is trusted by the computer domain. Authenticated Users will contain all manually created user accounts in all trusted domains regardless of whether they are a member of the Domain Users group or not.  Authenticated Users specifically does not contain the built-in Guest account, but will contain other users created and added to Domain Guests.

The following list shows the members who are fall under this group

  1. All the domain users and  users who are in trusted domain.
  2. Local computers.
  3. Built-in system accounts.

The local computer account is always a member of the Authenticated Users group even when disconnected from the network.  However, just like Domain Users, the local computer account must first authenticate to the domain to be considered part of the Authenticated Users token when connecting remotely to other computers within its trusted domains.

The SID for Authenticated Users is S-1-5-11.  Authenticated Users is available when applying permissions directly to an object, or can be placed in Built-in and user created Local computer groups.  Authenticated Users cannot be added as a member to another user created domain groups (Global, Domain Local, or Universal).  However, the Authenticated Users group can be added to the Built-in Domain Local groups.

When working with domain user accounts and local user accounts remember that the local user accounts will also be members of Authenticated Users, and will therefore have access to local resources secured with this permission.  However, the scope of the local user accounts’ access will not extend onto remote computers via the Authenticated Users group.  This is because while the local user account includes the SID for the Authenticated User group, the local user must still authenticate to any remote computer prior to access being granted.

 Recommendation for Security: Use the Authenticated Users group instead of the Everyone group to prevent anonymous access to a resource.

Domain Users

Domain Users is the group in which we can add or remove members that we can not do in Authenticated Users group . In a domain environment, the Administrator account and all new user accounts are automatically included as members of this group. This group is also a member of the Users local group for the domain and for every Windows computer in the domain

By default all users created in the domain are automatically members of this group.  However, the default Guest account in the domain is not a member of this group, instead it is placed in the Domain Guest group

The SID for Domain Users is S-1-5-<domain>-513.  The Domain Users group can be added to other domain groups, and can be given permissions directly to objects, as well as placed in Local computer groups.

You can refer this article http://technet.microsoft.com/en-us/library/dd277461.aspx to know about other built-in groups.

References
https://morgantechspace.com/2013/08/authenticated-users-vs-domain-users.html

Apply Group Policy to Security Group

It’s not possible to apply a group policy to a security group . However, you can change the permissions on group policy so that only certain users/groups have read and apply privileges.

Step 1:

Select the Group Policy Object in the Group Policy Management Console (GPMC). Click on the Delegation tab and then click on the Advanced button.

Step 2:

Click on the Add button and select the security group that you wish to apply to . Then select the group (e.g. “Accounting Users”) and scroll the permission list down to the “Apply group policy” option and then select the Allow permission.

This Group Policy now applies to only users or computers that are a member of the Accounting Users security group. However you still need to remember that the user and/or computer should be part of the site/domain/OU to which this Group Policy Object is linked.

References
https://www.manageengine.com/products/active-directory-audit/kb/how-to/how-to-apply-group-policy-to-security-group.html

Adding Users to the Local Admin Group via Group Policy

You can use GPO (Group Policy) to add Active Directory users and groups to the local Administrators group on domain-joined servers and workstations. This allows you to grant local admin privileges on domain computers to technical support staff, HelpDesk team, specific users or other privileged accounts. In this article we’ll show how to manage members of the local Administrator group on domain computers using GPO.

Local Administrators Group in Active Directory Domain

When you joining a computer to an AD domain, the Domain Admins group is automatically added to the local Administrators group, and the Domain User group is added to the local Users group.

The easiest way to grant local admin privileges on a computer is to add a user or group to the local security group Administrators using the Local users and groups snap-in (lusrmgr.msc). However, this method is not convenient if there are a lot of computers and in some time unwanted people may stay the members of the privileged group. If you are using this method of granting local privileges, it is not convenient to control the members of the local admins group on each domain computer.
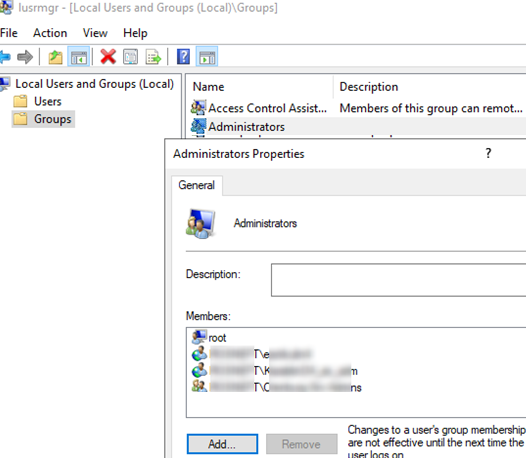
Microsoft recommends using the following groups to separate administrative privileges in an AD domain:

  1. Domain Admins are used only on domain controllers;
    From the security point of view for privileged administrator accounts, it is not recommended to perform daily administration tasks on workstations and servers under an account with the Domain Admin privileges. These accounts must be used only for AD management  (adding new domain controllers, replication management, Active Directory schema modification, etc.). Most user, computer or GPO management tasks must be delegated to regular administrator accounts (without Domain Admin permissions). Do not use Domain Admin accounts to log on to any workstations or servers other than domain controllers.
  2. Server Admins is a group that allows to manage the domain member servers. It must not be a member of the Domain Admins group or local Administrators group on your workstations;
  3. Workstation Admins is a group for performing administrative tasks on workstations only. Must not be a member of the Domain Admins and Server Admins groups;
  4. Domain Users are common user accounts to perform typical office operations. They must not have any administrator privileges on servers or workstations.
You can also completely refuse from providing any administrator privileges to domain users or groups. In this case, the built-in local Administrator account with a password stored in AD (LAPS-based) is used to perform administrative tasks on workstations.

Suppose, you want to grant local administrator privileges on computers in the specific OU to the group of technical support and HelpDesk employees. Create a new security group in your domain using PowerShell and add the technical support accounts to it:

New-ADGroup munWKSAdmins -path 'OU=Groups,OU=Munich,OU=DE,DC=woshub,DC=com' -GroupScope Global –PassThru
Add-AdGroupMember -Identity munWKSAdmins -Members amuller, dbecker, kfisher

Open the domain Group Policy Management console (GPMC.msc), create a new policy (GPO) AddLocaAdmins and link it to the OU containing computers (in my example, it is ‘OU=Computers,OU=Munich,OU=DE,DC=woshub,DC=com’).

AD Group Policy provides two methods to manage local groups on domain computers. Let’s study them in turn:

  • Local groups management using Group Policy Preferences;
  • Restricted Groups.

How to Add Domain Users to the Local Administrators via GPO Preferences?

Group Policy Preferences (GPP) provide the most flexible and convenient way to grant local administrator privileges on domain computers through a GPO.

  1. Open the AddLocaAdmins GPO you created earlier in the Edit mode;
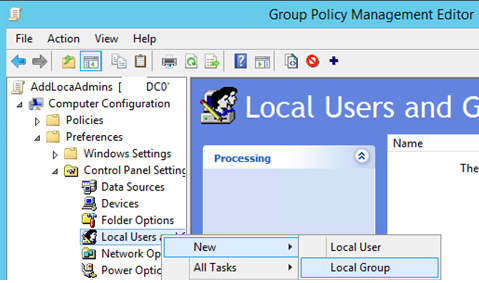
  2. Go to the following GPO section: Computer Configuration –> Preferences –> Control Panel Settings –> Local Users and Groups;
  3. Add a new rule (New -> Local Group);

  1. Select Update in the Action field (it is an important option!);
  2. In the Group Name dropdown list, select Administrators (Built-in). Even if this group has been renamed on the computer, the settings will be applied to the local Administrators group by its SID — S-1-5-32-544;
  3. Click the Add button and select the groups you want to add to the local administrators group (in our case, it is munWKSAdmins);
    If you want to remove manually added users and groups from the current local Admins group, check the “Delete all member users” and “Delete all member groups” options. In most cases it is reasonable since you guarantee that only the assigned domain groups will have administrator permissions on your domain computers. Then if you add a user to the Administrators group manually using the “Local users and groups” snap-in, it will be automatically removed next time when the policy is applied.
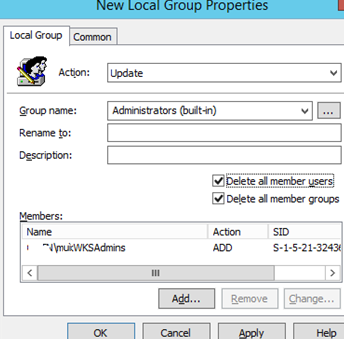
  1. Save the policy and wait till it is applied on the workstation. To apply the policy immediately, run this command gpupdate /force on a user computer;
  2. Open the lusrmgr.msc snap-in on any computer and check the local Administrators group members. Only the munWKSAdmins group will be added to this group, while other users and groups will be removed. You can display the list of the local administrators using the command: net localgroup Administrators
If the policy has not been applied on a domain computer, use the gpresult command to diagnose the problem. Also make sure that the computer is located in the OU the GPO is linked to and check the recommendations from the article “Group policy objects not being applied to computers“ .

You can configure additional (granular) conditions for targeting the policy on the specific computers using the GPO WMI filters or Item-level Targeting.

In the second case, go to the Common tab and check the Item-level targeting. Click Targeting. Here you can specify the conditions when the policy will be applied. For example, I want the policy of adding administrator groups to be applied only to Windows 10 computers, which NetBIOS/DNS names don’t contain adm. You can use your own filtering options.
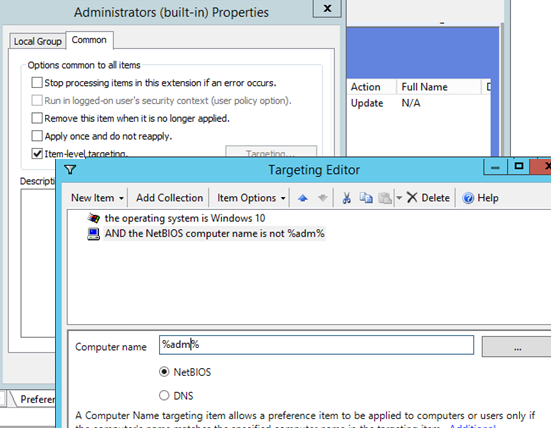
It is not recommended to add individual user accounts to this policy. It is better to use the domain security groups. In this case, to grant administrator privileges to another tech support employee, it is enough to add them to the domain group (you won’t need to edit the GPO).

Managing Local Admins Group Using Restricted Groups

The Restricted Groups policy also allows to add domain groups/users to the local security group on computers. It is an older method of granting local administrator privileges and is used less often now (it is less flexible than that the Group Policy Preferences method).

  1. Open a GPO in the editing mode;
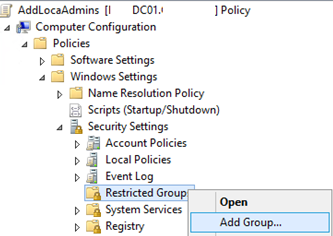
  2. Expand the section Computer Configuration -> Policies -> Security Settings -> Restricted Groups;
  3. Select Add Group in the context menu;

4.In the next window, type Administrators and then click OK;
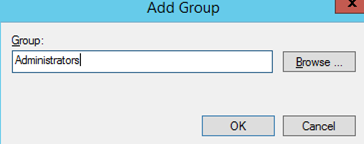
5.Click Add in the Members of this group section and specify the group you want to add to the local admins;
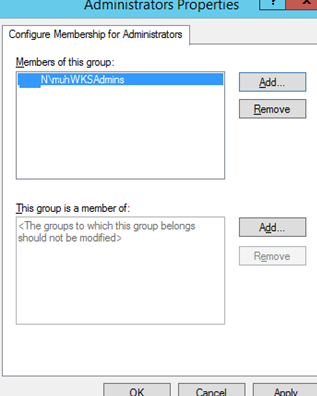
  1. Save the changes, apply the policy to user computers and check the local Administrators group. It must contain only the group you have specified in the policy.
This policy always (!) removes all other members of the local administrators group (added manually, or using other policies or scripts). If several policies with the Restricted Groups settings are active for a computer, only the last one is applied. You can bypass this limitation by first adding the munWKSAdmins group to the Restrictred Groups, and then adding this group to the Administrators group.

Using GPO to Add a Single User to the Local Admin Group on a Specific Computer

Sometimes you may need to grant a single user the administrator privileges on the specific computer. For example, you have several developers who need elevated privileges from time to time to test drivers, debug or install them on their computers. It is not advisable to add them to the group of workstation admins on all computers.

To grant local administrator privileges on the specific computer, you can use the following scheme:

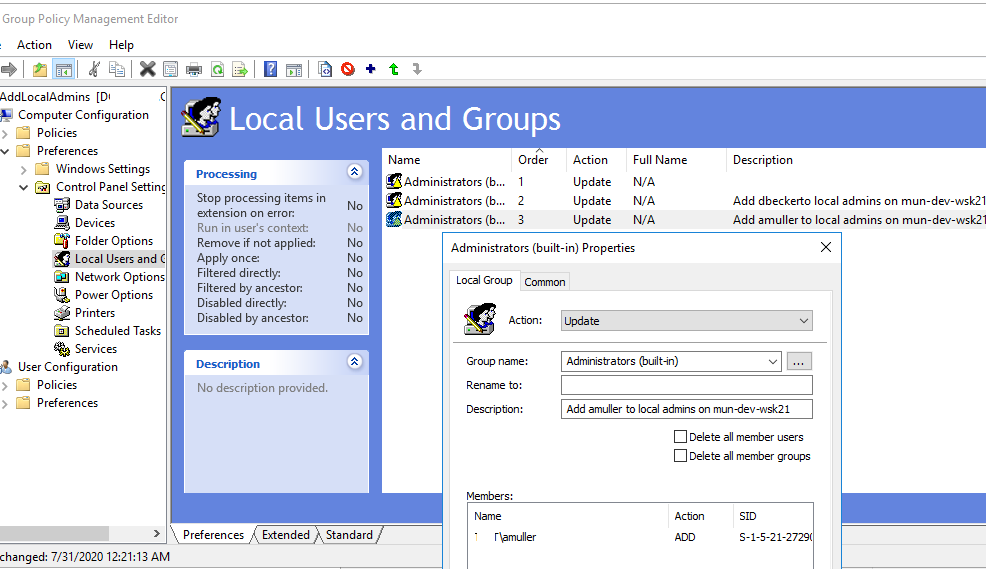
Right in the GPO preference section (Computer Configuration –> Preferences –> Control Panel Settings –> Local Users and Groups) of AddLocalAdmins policy created earlier create a new entry for the Administrators group with the following settings:

  • ActionUpdate
  • Group NameAdministrators (Built-in)
  • Description: “Add amuller to the local administrators on the mun-dev-wsk21 computer
  • Members: Add -> amuller

In the Common -> Targeting tab, specify this rule: “the NETBIOS computer name is mun—dev-wks24.” It means that this policy will be applied only to the computer specified here.
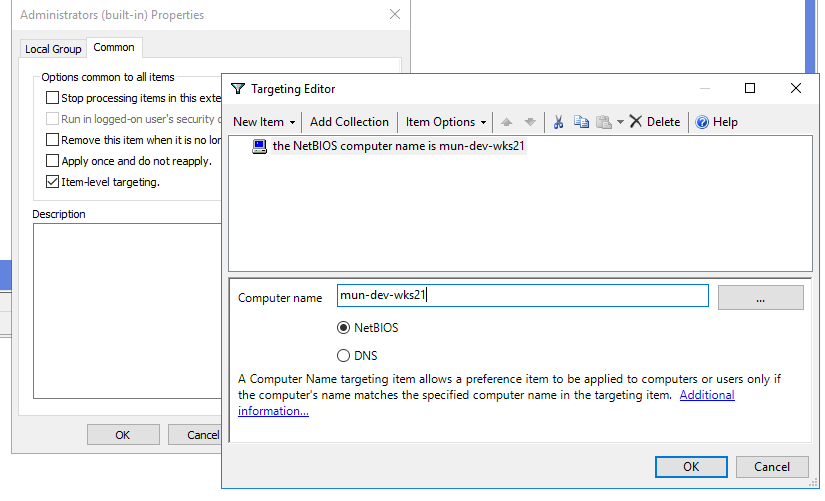
Also, pay attention to the order in which groups are applied on the computer (the Order GPP column). Local group settings are applied from top to bottom (starting from the Order 1 policy).

The first GPP policy (with the “Delete all member users” and “Delete all member groups” settings as described above) removes all users/groups from the local administrator groups and adds the specified domain group. Then the additional  computer-specific policies are applied that add the specified user to the local admins. If you want to change the membership order in your Administrators group, use the buttons on top of your GPO Editor console.
Create a New Active Directory User Account in Windows Server

This article walks through creating a new Active Directory user account using the Active Directory Users and Computers MMC.

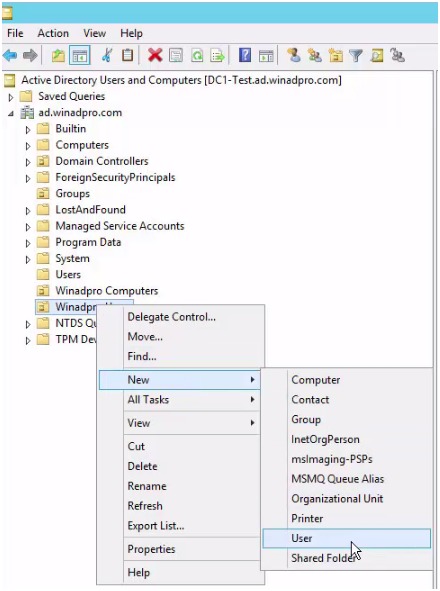
1. Open Active Directory Users and Computers MMC

2. Right click the folder where you want to create the new user account, select new and then click user. If you have not created additional organizational units, you can put the new account in the Users folder. In my example, I’m putting the account in the Winadpro Users folder that I have created.

References
https://activedirectorypro.com/how-to-create-a-new-active-directory-user-account/

Disable the Windows Password Policy Rules in Windows Server

The Windows password policy rules can place restrictions on password history, age, length, and complexity. If you enable the PPE rules and the Windows rules, then users will have to comply with both sets of rules.

PPE has its own History, Minimum Age, Maximum Age, Length, and Complexity rules. You can use the PPE and Windows rules together, but it is easier to disable the Windows rules and use the PPE rules instead. To disable the Windows password policy rules:

1. Use the Group Policy Management Console, or Active Directory Users and Computers console to display the GPOs linked at the domain level.
2. Right-click the Default Domain Policy GPO (or whichever GPO you use to set your domain password policy), and then click Edit.
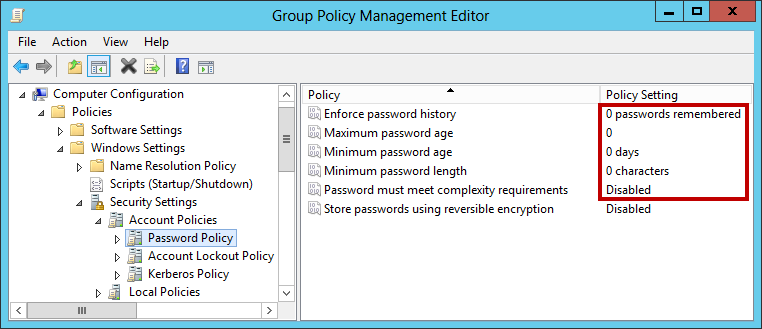
3. Expand the Computer Configuration, Policies (if it exists), Windows Settings, Security Settings, Account Policies, and Password Policy items.
4. Double-click Enforce password history in the right pane of the GPO Editor. Type 0 in the text box, and then click OK.
5. Repeat the step above for the Maximum password age, Minimum password age, and Minimum password length policies.
6. Double-click Password must meet complexity requirements in the right pane. Select the Disabled option, and then click OK.
7. Close the Group Policy Management Editor.

You do not have to disable all the Windows password policy rules to use PPE. You can use a combination of PPE and Windows rules together if you like. Just remember that a password is only accepted if it complies with the rules enforced by both Windows and PPE.

References
https://anixis.com/doc/ppe76ag/ppe_disable_the_windows_password_policy_rules.htm

Block Inbound Connection for RDP in Windows Server

1 – Search for Windows Firewall, and click to open it.
2 – On the left, click Advanced Settings.
3 – From the left pane of the resulting window, click Inbound Rules.
4 – In the right pane, locate the following rules:

Remote Desktop - Shadow (TCP-In)
Remote Desktop - User Mode (TCP-In)
Remote Desktop - User Mode (UDP-In)

5 – Right-click each rule and choose Disable Rule.

References
https://kb.iu.edu/d/amyp