Use Location State in React Router

Location State is a value that persists with a location that isn’t encoded in the URL. Much like hash or search params (data encoded in the URL), but stored invisibly in the browser’s memory.

You set location state in two ways: on <Link> or navigate:

<Link to="/pins/123" state={{ fromDashboard: true }} />;

let navigate = useNavigate();
navigate("/users/123", { state: partialUser });

And on the next page you can access it with useLocation:

let location = useLocation();
location.state;

References
https://reactrouter.com/docs/en/v6/getting-started/concepts#locations
Working with Query Parameters in React Router

import {useLocation, useNavigate} from 'react-router-dom'

function Welcome() {
    const location = useLocation();
    const navigate = useNavigate();
    
    // URLSearchParams defines utility methods to work with the query string of a URL.
    const queryParams = new URLSearchParams(location.search);
    const paramName = queryParams.get("name");

    console.log(location);

    return (
        <div>
            <div>
                <button className={"btn mx-2"} onClick={event => {
                    navigate("/welcome");
                }}>Reset
                </button>

                <button className={"btn mx-2"} onClick={event => {
                    navigate("/welcome?name=Mahmood");
                }}>Mahmood
                </button>

                <button className={"btn mx-2"} onClick={event => {
                    navigate("/welcome?name=Nasim");
                }}>Nasim
                </button>
            </div>

            <div>Hello {paramName}</div>
        </div>
    );
}

export default Welcome;

References
https://reactrouter.com/docs/en/v6/getting-started/concepts#locations

Relative Links in React Router

Relative <Link to> values (that do not begin with a /) are relative to the path of the route that rendered them. The two links below will link to /dashboard/invoices and /dashboard/team because they’re rendered inside of <Dashboard>.

import {
  Routes,
  Route,
  Link,
  Outlet,
} from "react-router-dom";

function Home() {
  return <h1>Home</h1>;
}

function Dashboard() {
  return (
    <div>
      <h1>Dashboard</h1>
      <nav>
        <Link to="invoices">Invoices</Link>{" "}
        <Link to="team">Team</Link>
      </nav>
      <hr />
      <Outlet />
    </div>
  );
}

function Invoices() {
  return <h1>Invoices</h1>;
}

function Team() {
  return <h1>Team</h1>;
}

function App() {
  return (
    <Routes>
      <Route path="/" element={<Home />} />
      <Route path="dashboard" element={<Dashboard />}>
        <Route path="invoices" element={<Invoices />} />
        <Route path="team" element={<Team />} />
      </Route>
    </Routes>
  );
}

References
https://reactrouter.com/docs/en/v6/getting-started/overview#relative-links

Not Found Page in React Router

When no other route matches the URL, you can render a “not found” route using path="*". This route will match any URL, but will have the weakest precedence so the router will only pick it if no other routes match.

function App() {
  return (
    <Routes>
      <Route path="/" element={<Home />} />
      <Route path="dashboard" element={<Dashboard />} />
      <Route path="*" element={<NotFound />} />
    </Routes>
  );
}

References
https://reactrouter.com/docs/en/v6/getting-started/overview#not-found-routes

Nested Routes in React Router

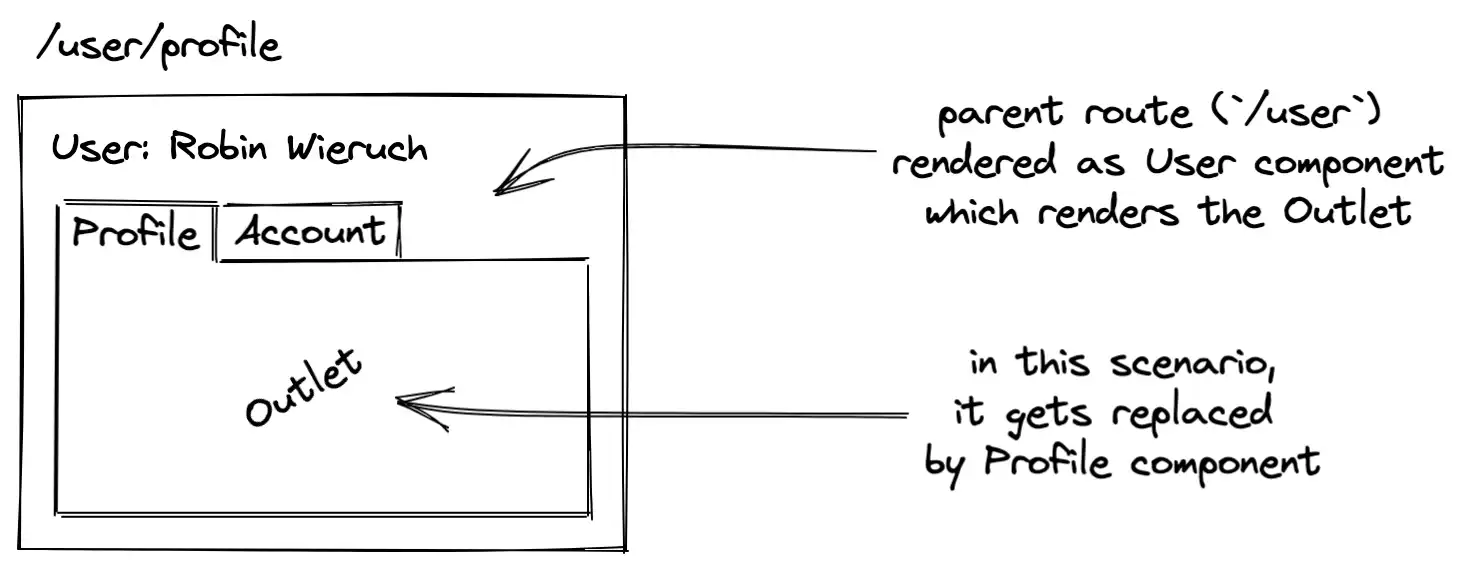
Imagine we want to have the nested routing for User page via tabs.

function App() {
    return (
        <div>
            <Routes>
                <Route path="/" element={<Home/>}/>
                <Route path="/user" element={<User/>}>
                    <Route path="account" element={<Account/>}/>
                    <Route path="profile" element={<Profile/>}/>
                </Route>
            </Routes>
        </div>
    );
}
function User() {
    return (
        <div>
            <h1>User Page</h1>
            <Link to="profile">Profile</Link>
            <br/>
            <Link to="account">Account</Link>
            <Outlet/>
        </div>
    );
}

The Outlet component will always render the next match.
The parent route (User) persists while the swaps between the two child routes (Profile and Account).

References
https://reactrouter.com/docs/en/v6/getting-started/tutorial#nested-routes
https://reactrouter.com/docs/en/v6/getting-started/concepts#outlets
https://ui.dev/react-router-nested-routes
https://www.robinwieruch.de/react-router-nested-routes/

Reading URL Params in React Router

App.tsx

function App() {
    return (
        <div>
            <Navbar/>
            <Routes>
                <Route path="/welcome" element={<Welcome/>}/>
                <Route path="/products" element={<Products/>}/>
                <Route path="/products/:product" element={<Product/>}/>
            </Routes>
        </div>
    );
}

Products.tsx

import {useParams} from 'react-router-dom'

function Product() {

    let params = useParams();

    return (
        <div>
            <strong>Product : </strong>{params.product}
        </div>
    );
}

export default Product;

References
https://reactrouter.com/docs/en/v6/getting-started/tutorial#reading-url-params

Display Active Links in React Router using NavLink

It’s very common, especially in navigation lists, to display the link as the active link the user is looking at. Let’s add this treatment to our invoices list by swapping out Link for NavLink.

import { NavLink, Outlet } from "react-router-dom";
import { getInvoices } from "../data";

export default function Invoices() {
  let invoices = getInvoices();
  return (
    <div style={{ display: "flex" }}>
      <nav
        style={{
          borderRight: "solid 1px",
          padding: "1rem",
        }}
      >
        {invoices.map((invoice) => (
          <NavLink
            style={({ isActive }) => {
              return {
                display: "block",
                margin: "1rem 0",
                color: isActive ? "red" : "",
              };
            }}
            to={`/invoices/${invoice.number}`}
            key={invoice.number}
          >
            {invoice.name}
          </NavLink>
        ))}
      </nav>
      <Outlet />
    </div>
  );
}

We changed the color of our link by looking at the isActive value that NavLink passed to our styling function.

You can do the same thing with className on NavLink:

// normal string
<NavLink className="red" />

// function
<NavLink className={({ isActive }) => isActive ? "red" : "blue"} />

References
https://reactrouter.com/docs/en/v6/getting-started/tutorial#active-links